Scales
Many DEACOM customers make extensive use of Scales to ensure accurate weight requirements are adhered to and the correct weights are recorded both in the system and on generated labels. DEACOM’s scale integration allows customers to maintain accurate weights while streamlining weigh up and finishing processes without having to rely on third party software. The DEACOM system is designed to integrate scales for use when performing the following functions:
- Final Staging via Inventory > Inventory Final Staging - Utilize a scale to weight Raw Materials being issued to a Job.
- Finishing Material/Creating Pallets via the DEACOM AutoFinisher - Capture weight, input production, serialize, label, and palletize Finished Goods at Job Finish.
The integration of scales involves:
- setting up the scale model in DEACOM via Production > Maintenance > Scales.
- Physically connecting the scales to PCs
- The selection of the connected scales in the DEACOM application.
- Last, the configuration of Item Masters and Inventory Options to have weight inputs transferred from the scale to the appropriate fields/tables in the system.
Configuration
The process for setting up and installing scales is the same as configuring the scales. Therefore, everything necessary for configuring scales is contained in the process section below.
Process
Connecting the scale to the PC via COM Port
- Turn the scale on. No specific setup is required for the scale itself.
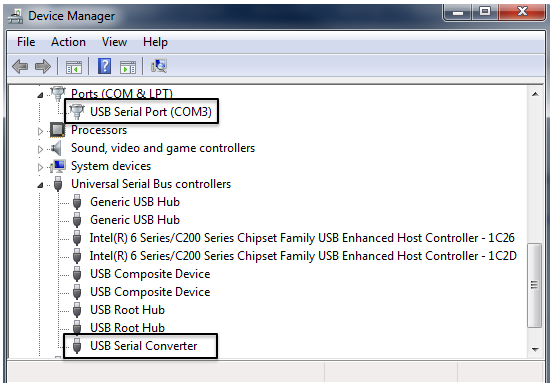
- Connect the scale to the PC using the supplied serial/USB cable. The PC will attempt to install a device driver for the USB/serial cable. This results in a COM port being identified/installed on the PC, which can be seen via the Device Manager on the computer's Control Panel.
- If the driver cannot be found, users will need to search the internet for the appropriate drivers. The type of driver required can be determined by checking the Device Manager on the PC to see what device has a conflict/missing driver.
Connecting the scale to the PC via IP Address (available beginning in version 17.04)
- Ensure the PCs/devices that will be used with the scale have access to the appropriate network(s).
- On the scale model via Production > Maintenance > Scales, set the Connection Type field to "IP Address" and enter the exact IP address in the "IP Address" field. Save the form when complete.
Installing Local services
The DEACOM Local and DEACOM Cloud Local options, accessed via File > Local in the web versions of DEACOM, is used to connect to any local hardware that is supported in DEACOM web versions. Currently, this includes local printers, scales for final staging or sales packages, and EMV card readers. If the DEACOM Local / Cloud Local option has already been installed, it should be visible in the PC tray. If the necessary service is not installed, follow the steps listed in Installing DEACOM Local and Installing DEACOM Cloud Local.
Adding Scales in DEACOM
Scales are used to define the interface used to communicate to a particular type of scale. These settings are used by the AutoFinisher application, as well as various forms in the main application that feature scale integration, such as the FedEx Scan Parts option via Sales > Ship and the Inventory Final Staging function.
- Navigate to Production > Maintenance > Scales.
- Click "New" to open the New Scale Model form.
- Complete all required fields. The example on the Scales page provides useful default values for these fields.
- Ensure the "Active" flag is checked.
- Click the "Save" button to save the record.
Selecting the scale model via File > Settings
Once the appropriate Scale Model(s) has been created, users will need to identify which Scale Model will be used via the “Scales” field in File > Settings.
- Navigate to File > Settings.
- In the "Scales" field, select the appropriate scale model from the list.
- Click "Save" then exit the form to complete the process.
Add Scale Input to Form Layouts
The value of a connected scale can be transferred into any numeric field in the DEACOM Main Application when using Form Layouts.
- Adjust a Form Layout.
- Select numeric text field
- Check the “Scale Input” flag.
Once it is checked, this field will populate whenever the bound scale reads a weight for a part. Minimizes user entry error potential.
FAQ & Diagnostic Tips
The following tips may be used to troubleshoot scale integrations. These tips are geared more towards Final Staging rather than the AutoFinisher, although some of the tips will apply to both environments.
- Use Windows Device Manger to identify the specific COM port the Scale is connected to.
- Make sure DEACOM Local is installed and Connected.
- Might need admin access to the machine to install if not.
- Run the SerialTest program provided by your Deacom Implementation Consultant.
- Use this program to select the port, and ensure that the computer is reading from the scale.
- If the SerialTest application is reading, but DEACOM is not, ensure that you have closed the port on the SerialTest app. Only one application is allowed to access the port at any one time, so if the SerialTest program is using it, DEACOM will be blocked from accessing the scale.
- If the SerialTest application is reading, but DEACOM is not, check to see if DEACOM Local is installed and Connected.
- If SerialTest is not reading the scale, reset the scale and re-initialize the SerialTest application.
- Rebooting the PC might also help.
- Some Scales require the scale to print in order to send the information to a computer or printer. This might require pushing a Print button to get DEACOM and/or the SerialTest application to read the scale information.
- Many of such scales have settings to auto print while under weight.
- If you are in the Inventory Final Staging form, ensure that the correct Scale is selected in the "Scale Model" field in the upper left-hand side of the form.
-